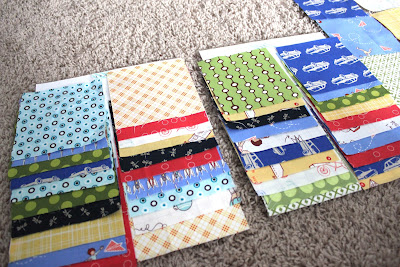
I love sewing with squares, they are fast, easy and look great.
Well......
Do you know a fast way to sew squares together?
I do, and I'm going to share..
IF you don't already sew this way, once you learn you will never go back (at least I love it).
lets get started.
Supplies needed for quilt top:
4 card stock papers (or more depending on how big your quilt will be)
pre-cut 5 inches squares (or any size you like)
washable marker/pen
ruler
rotary cutter
sewing machine/thread
PLEASE READ THROUGH TUTORIAL BEFORE STARTING

You will need at least 4 pieces of card stock or any type of heavy weight paper. More if your sewing a big quilt, but for a baby size 4 will do.
I used 81/2" by 11" card stock
On your card stock you will need to write 2 numbers on the top of each card. Start with 1 and 2 on the first card. The next one 3 and 4, keep going till all your card stocks are numbered. If you have 4 card stocks then your last number will be 8.
I wrote my numbers on washi tape, just cause it makes it prettier
(I love washi tape).
Next your going to get your fabric ready.
For this quilt and tutorial I used fabrics from my stash and cut 5" strips from the yardage.
Making 5" squares.
Making 5" squares.
You can use pre-cut charm squares if you're making a quilt from one collection.
However, cutting your own is also easy.
Once all fabric is cut you're ready to lay out your quilt.
Since this is a square quilt I used 100 squares to make a 10x10 row quilt. This gave me a quilt that is a little bigger than a baby swaddle blanket. Just the perfect size for a baby to grow into.
Lay out your fabrics to how you want your quilt to look.
(for me this is the most time consuming, making sure all
fabric are placed pleasingly)
fabric are placed pleasingly)
Now for the part that is going to make sewing this top super easy and fast and where you use your cards.
Take your card labeled 1 and 2.
Start at the bottom end of your quilt with rows 1 and 2.
Begin to lay the very last square in row 1 and 2 on the bottom of your card.
Proceed to the next square in each row and lay it on the previous square. Layering so you see each fabric.
Continue this process until both rows are layed together on the card.
it will look like this when rows 1 and 2 are completed
continue on to the other rows using the next card labeled 3 and 4
stack your cards on top of each other with row 7 and 8 on the bottom and row 1 and 2 on top
here is the fun part
you will start to sew your rows together
Start with the card labeled 1 and 2, take the top squares, one from row 1 and one from row 2
Sew right sides together like so
IMPORTANT: DON'T CUT YOUR THREAD
1/4 yd seam throughout
and continue sewing a row 1 to a row 2 until you make your way through those two rows
Chain piecing so don't cut thread.
Does yours look like this?
and this?
your first
card stock should now be empty
after you have sewn your last 2 squares
you can NOW cut the thread
Take the next card which will be 3 and 4 and start with the first square of row 3 (top square)
Open up your first sewn rows of 1 and 2
take the first square from row 3 and place right sides together on top of row 2
begin to sew the squares together
continue sewing squares right sides together BUT ONLY pull the squares from row 3
This is what is should look like. No cut threads, all in one piece.
NOTE: if you do cut your thread by accident, just re-join it all
together to create a big piece.
As you make your way through your rows, it should start to look like this
When all rows are sewn, lay your quilt top on floor to admire your work
(..wow that looks good!)
After admiring your work, grab your quilt top and head back to your machine.
We are now going to sew the rows together horizontally, by starting in the middle of the quilt top. Pick a row about the middle and line up the 2 rows right sides together, making sure to line up your seams.
Once you have the 2 rows sewn together begin on the next row. I like to work one end first sewing all together then begin on the other half of the quilt top until the whole top is sewn together.
Iron it up and your DONE!!!!!!
I really love how this turned out!!!
I backed this quilt with jade minky dot that can be found here.
Go make a square quilt using this tutorial and send us your pictures.


1 comments:
That is genius! Thank you for sharing!
This is why I love Patchwork - there are so many awesome ways to get the job done, so you just HAVE to continue sewing and buying fabric ;)
Post a Comment