Monday, February 21, 2011
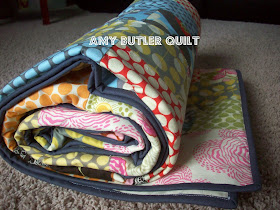
Amy Butler, Quilt FINISHED!!!!
(hot off the press...I was so excited to get some pictures I haven't had a chance to take off strings :) )
Remember back when I first started this quilt? (HERE) it was 1 year ago.. this quilt started off being my first EVER quilt, but has slowly fell behind.. I have made it my mission to get it finished and I am so glad I can say that it's DONE!!!!
I, like many of you fell in LOVE with AMY BUTLER'S fabric especially her lotus collection. (which can be found HERE) Which along with her FREE pattern enspired me to make this quilt..
I am so proud of it, and can't wait to put it on my daughters bed..
front
back
and of course I needed one with my little one!
this quilt is bound with kona cotton solid COAL and is available for purchase HERE.
Quilt stats:
Material: cotton- Amy Butler mix of Lotus collection
Finished size: 72x72
Design by: Amy Butler, found on her website HERE
Quilting by: Me
Quilting pattern: don't know the term, but lines that cross over making squares (?)
Binding: Kona Cotton Coal, machine stitched on
Keeping it Real (a special section to confess all of my screw-ups!): wish I did not back it with muslin, maybe off white or some other coordinating solid fabric, just not loving the muslin..(but it does go well) I usually cut my binding width 2 1/4in, which I like on my baby blankets, but I'm thinking I better stick to 2.5 inches width for a little chunkier binding..
All in all for my first big, more work involved quilt, I LOVE LOVE LOVE IT and have been using it every night!
linked to fabric Tuesdays over on QUILTSTORY
Tuesday, February 15, 2011
New Patterns
I just love these new patterns that have arrived from Cluck Cluck Sew! these patterns just drew me in..
I have 3 to choose from, her newest pattern Kaleidoscope, (seen above) is what I am working on now in a crib size and will be available as a kit...want a sneak peek at the fabrics used? here you go!
Just love these new fabrics from Michael Miller's baby collection... it totally screams BOY.. and we all know how hard it is to find some REALLY great boy fabric! click HERE for fabric
the other 2 patterns are:
Juice box
and basket case
so pick up your pattern today and getting FREE shipping with the purchase of fabric!
Monday, February 7, 2011
Super easy tote bag tutorial..(updated)
This is a great super, fun and easy tote bag tutorial that you will want to make over and over again!
(updated 04/18/2014)
Please read entire instructions prior to cutting fabric or starting.
What you need is:
1/2 yd of 2 different fabrics
2 yds coordinating webbing
2 pieces batting, thin like warm and natural 15"x 10" -not meant to cover whole bag
From these items you want to cut you're fabric into these measurements:
2 pieces batting (thin like warm and natural) 15"length x 10" wide
2 bag pieces 15"length (left to right if using directional) x 20.5"wide (up and down)
2 pocket pieces 15"length x 16.5" wide
cut webbing into two 1 yd pieces
Now you're ready to start!
First fold pocket piece in half and press, then you're going to layer your pieces
You should have 2 sets of these sandwich like sets..
Next take one set and pin one of the webbing yards, to make the straps. Starting at the bottom leave about 4" between each strap.
do this to the other set, so both look like this..
Now you're going to stitch the strap to all 3 layers, starting at one cut end of webbing, sewing along the edge of the strap. You will stitch pass the pocket and up to where your batting edge ends. (this will allow the fabric to show at the top above the pocket when finished)
Pivot your bag with needle down and sew the other edge of the strap back down to where you started. This will tack down both edges of this strap.
Repeat this to other side of strap on same side of bag your working on.
Repeat to other bag side. Once both are complete you are half way DONE! Now layer the 2 bag sides one on top of each other right sides together. At this point your straps are loose on the inside of the bag, just make sure to keep them out of the way, when you sew. Pin together leaving a 5" opening at the top center. (remember sewn straps are at the bottom of the bag) Stitch 1/2 inch around all 4 sides. Remembering to leave a 5" opening.
Now you're going to shape corners of bag and lining. (bit tricky) You're going to open up the corner and press it down so it looks like this.
then pin it and measure 2" from the point and about 4" across and sew along that 4".
Do this to all 4 corners. Does you're bag look like this? (TIP before you cut the corners I would make sure that the lining fits great, just in case you need to make some adjustments...I'm talking from experience)
NOW slowly turn it inside out, and if you're lining sits great, then go ahead and cut the corners. You can now stitch closed the lining (the 5" opening) with a small stitch.. and lastly you're going to top stitch the top of the bag...Remember you're top stitching so make a bigger size stitch, like a 4.0 would be great..
isn't this cute? my friend made this one for her little girl.. even her inside looks so professional..
Now both of these bags used the same pattern, but obviously they turned out a little different..(I think my bag measurements were a little off.. to my defense it was about 7pm and my brain shuts off at 5p...) but they both still look good. so with that said if you bag comes out a little bigger or smaller it will still do it's job and know one will know but you..
Go and make some and send me pictures. I would love to see what you can create!
My elephants bag was made from Daiwabo Japan Fabric, Tip Top Elephant Walk grey, lightweight Cotton canvas and zag stripe chevron in pink.
Friends bag made from Patty Young Sanctuary line, Aromatherapy sherbet and glass tiles sherbet from lining..
all fabric can be found HERE and batting and webbing can be found at any local fabric shop. I got mine from jo-anns.
Our bags finished size (yours could come out slightly different)
width 13.5"
height 10.5"
including handle 16" high
depth 4"..
Sunday, February 6, 2011
Kona cotton goodie bag!
This is a yummy goodie I just got in the mail, from a awesome seller HERE she sells all of the kona cotton solid colors out there. I needed a array of colors to see which ones I liked the best and I have to say it is a super hard choice deciding. Don't you think?
The best part about why I choose this seller, is because she labels each and every piece of fabric! don't you just hate it when you don't know the color just in case you need more? well having each fabric with the color is so AWESOME and you will never go clueless again..
Now just to make up my mind!
Thursday, February 3, 2011
HST Quilt kit (half square triangles)
Every month there will be a new quilt kit up and ready for purchase, HERE it's a bit late, but this HST quilt kit was for January..
My friends over at QuiltStory, have come up with this supper fun, and BEEutiful HST (half square triangle) quilt tutorial.. FREE to download and great to make for any beginner sewer wanting a new challenge..
This quilt is made up from some of Patty Young's cool palette from her newest line Sanctuary!
found HERE
Finished quilt measures 50x60
This kit includes:
120 PRE-CUT 6" squares (half white, half printed fabric)
2 yds YOUR CHOICE fabric from Sanctuary line for backing
3/4 yds Orchard Feng-Shui for binding (see pic)
You provide your own batting:
57x67
pattern not included but FREE to download HERE
fabrics used for HST:
Zen Garden Pear
Geo Bloom Seafoam
Glass tiles Aqua
Aromatherapy Seafoam
Orchard Feng-Shui Seafoam
Kona cotton white
this quilt kit can be found HERE
also don't forget about the CAT IN THE HAT QUILT KIT, a few are still avaliable..